SwatChat Documentation
Introduction
SwatChat is real-time complete chatting app with groups ,Video Conference and voice messages functionality. The user can send pictures, audio, video, contact detail, map location, voice messages, a user can create groups as well.
Setup
Android
*Note: Phone Authentication or some other functionality will not work on emulator. Kindly use real physical device for testing.
Before continuing make sure you have :-
- Firebase Account https://console.firebase.google.com
- Firebase’s Realtime Database is enabled. Use following security rule or use Start in test mode:
{ "rules": { // only authenticated users can read or write to my Firebase ".read": "auth !== null", ".write": "auth !== null" } } - Firebase’s Storage is enabled
- Phone Auth is enabled in Sign-in method in Firebase’s Authentication section
- Sinch Account https://www.sinch.com/
- SHA-1 fingerprint of your machine https://cloud.google.com/solutions/mobile/mobile-firebase-app-engine-flexible#generating_a_sha-1_fingerprint_for_the_app
After following the steps given below make sure you have values of all the following keys with you:
- applicationId
- app_name
- support_email
- sinch_app_key
- sinch_app_secret
- sinch_app_environment - set this to
clientapi.sinch.comfor production app - onesignal_app_id - follow https://app.onesignal.com/apps/new to add your app and obtain OneSignal app id
ADMOB Enablein app level build.gradle file Configure your AdMob banner IDs inad_unit_id1andad_unit_id2. ad_unit_id1 is used on outer chat list screen and ad_unit_id2 is used inside chat page. admob other ads also used in video conference page SwitchENABLE_ADMOBtotrueConfigure your AdMob App ID in meta tag with name “com.google.android.gms.ads.APPLICATION_ID” in AndroidManifest.xml file. Save changes and sync gradle. note: you will need to build the project at least once to be able to use build configurations. i.e. -> BuildConfig.ENABLE_ADMOBADMOB Disablein app level build.gradle file Simply switchENABLE_ADMOBboolean field tofalse. Remove meta tag with name “com.google.android.gms.ads.APPLICATION_ID” from AndroidManifest.xml file. Save changes and sync gradle. note: you will need to build the project at least once to be able to use build configurations. i.e. -> BuildConfig.ENABLE_ADMOBYou will need to update above values in
app/build.gradleRefactoring- Change the
applicationIdinapp/build.gradle, set this to the package name you want to keep for your application e.g com.SwatChat - Use the same package name while setting up android app in Firebase in the next step.
- Logo and placeholders used in app are png images which you will find in
app/src/main/res/drawablefolder. - To change the images in app simply replace the images at above mentioned location with your images.
Firebase SetupCreate a Firebase account or log into an existing account.
Click Add project. Follow the remaining setup steps and click Create project.
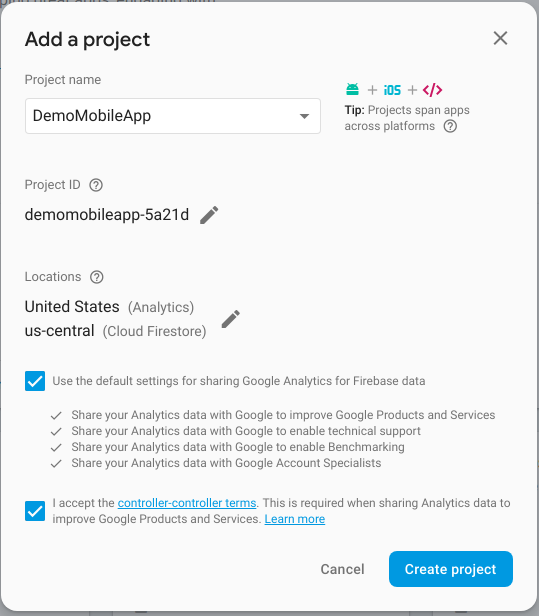
After the wizard provisions your project, click Continue.
In the Overview page of your project, click the Settings gear and then click Project settings.
Click Add Firebase to your Android app and follow the wizard
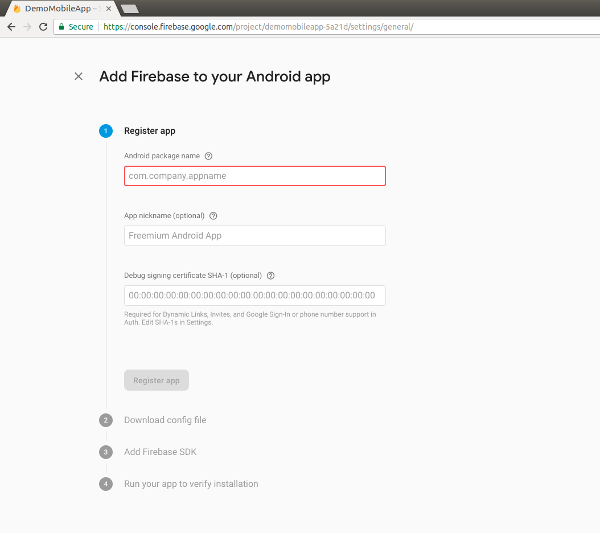
In Debug signing certificate SHA-1, enter the SHA-1 value you generated in the previous section.
Click Register app.
Download the google-services.json file and place it in
appfolder.
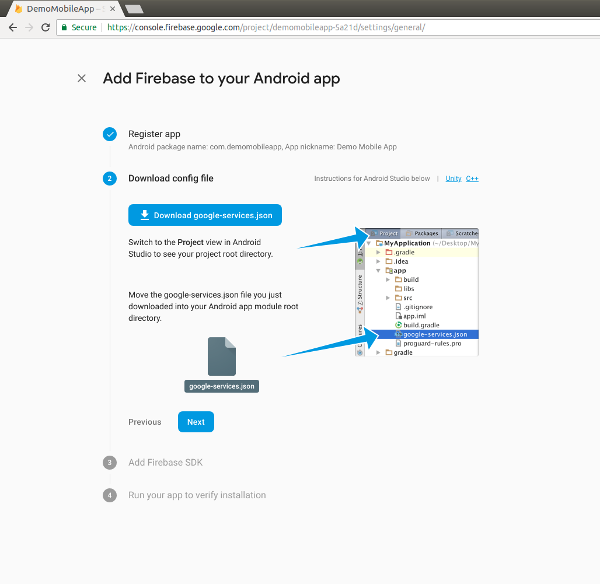
Click Next in the Download config file section and follow the rest of the steps if required.
Next click on Authentication and click on Sign-in method
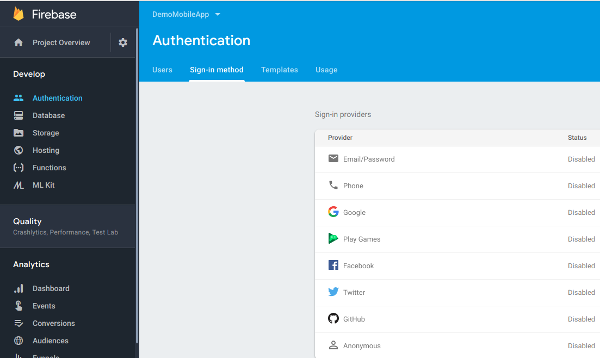
Enable Phone Authentication
Similarly enable Realtime Database and Storage from side menu.
ConfigurationandTheming- Open
app/build.gradle, you need to edit/add values in respective fields indefaultConfigunderandroid - Fill in
applicationIdwith your package name which you registered on firebase console - Fill in
app_nameandsupport_emailwith your desired app name and support email - For audio and video calling follow https://portal.sinch.com/#/signup to register your app name. Follow on screen instructions to obtain App Key and App Secret. Fill in these values in
sinch_app_keyandsinch_app_secretrespectively. Finally setupsinch_app_environmentconfiguration according to your sinch portal. - For notifications follow https://app.onesignal.com/apps/new to add your app and obtain OneSignal app id which will be used in
onesignal_app_idundermanifestPlaceholders. - You Don't have to change anything for video conferencing.
0 comments